Physical button that sends a text written in rust with raspberry pi
Today we are going to build a physical arcade style button that sends a text message when it is pressed.
There are plenty of how-tos on this subject with Python and a few other languages but this how-to will focus on using the Rust programming language!
This is a great beginner project because it gives us a taste of a many of different concepts.
We can use a raspberry pi of any type that connects to the internet so you can download the code and send a text message using the Twilio API.
Why Rust?
IF you know about Rust you can probably skip this section because you will already know this stuff.
If you don’t know about rust but you are more experienced you should check out the rust website for the main selling points. Spoiler- they are performance, reliability and productivity. Also the community rocks. Check out the rust site here; Rust Programming Language
If you are a beginner that wants to build cool stuff your imagination will benefit from the endless things you can do with the Rust language. Rust is what is known as a systems language which means you are coding at a very very low level. This give us the opportunity to build anything our hearts desire.
You can program websites, servers that run the websites, networking services, command line tools. You can code programs to run on embedded devices (those small computer chips that do really cool stuff like IoT).
You can also build entire blockchain systems to quickly prototype a crypto blockchain ideas. All of this (and much more) can be built in Rust and the ecosystem is full of helpful community members. Also rust is one of the most loved languages. While it has a steep learning curve it is becoming a top language of choice and is quickly being adopted by major companies like Microsoft, Facebook, Dropbox, Yelp among many many others.
Here is a list of companies that use Rust in production right now- Production users - Rust Programming Language
What you will need
- Raspberry pi (with wifi) & Power adapter (any raspberry pi with wifi will work. Even pi zero w.) If you plan to develop on your pi then it is best to upgrade to a pi 3 or pi 4 - Raspberry Pi 4 Model B - 2 GB RAM : ID 4292 : $35.00 : Adafruit Industries, Unique & fun DIY electronics and kits
- Tactical Button (one that you press like an arcade button) - Arcade Button with LED - 30mm Translucent Clear : ID 3491 : $2.50 : Adafruit Industries, Unique & fun DIY electronics and kits
- Wires that you can connect to the pins - Arcade Button and Switch Quick-Connect Wires - 0.187 (10-pack) : ID 3835 : $4.95 : Adafruit Industries, Unique & fun DIY electronics and kits
- HDMI cable to connect your raspberry pi
- USB keyboard & Mouse
- Micro SD Card (8gb is fine)
- Monitor that uses HDMI cables(your tv will work if it has HDMI)
Flashing an SD card for raspberry pi
The first thing you will need to do is get your Raspberry pi setup. If you already have Debian Buster Operating System with Raspberry Pi Desktop installed on your Pi you can skip this section.
- Download the Raspberry Pi Desktop from here- Operating system images – Raspberry Pi Note- use an operating system that has the Raspberry Pi Desktop unless you are completely comfortable with command line already.
- Download or open your flashing software- I use Etcher- balenaEtcher - Flash OS images to SD cards & USB drives (its free). Raspberry Pi also offers a flashing software that is great and also free here- Raspberry Pi OS – Raspberry Pi
- Format your SD card- (use Fat32 filesystem)
- Using Mac:
- plug in the SD card, go to the “disk utility” app
- Select your SD card that is mounted on the left and erase /format it
- Using Windows:
- Plug in the SD card
- Launch Windows Explorer
- From windows explorer right click the SD card drive
- Click format
- Using Mac:
- Once your SD card is formatted open up the Etcher app or your flashing software, select the operating system you downloaded and the SD card you want to flash and flash it.
Great! Now we can insert our SD card into the raspberry pi and get started.
Wiring a button for raspberry Raspberry PI
Now that we have our SD card flashed and inserted into our Raspberry Pi we can connect the button wires.
We will want to connect the button wires to GPIO 18 and the ground pin.
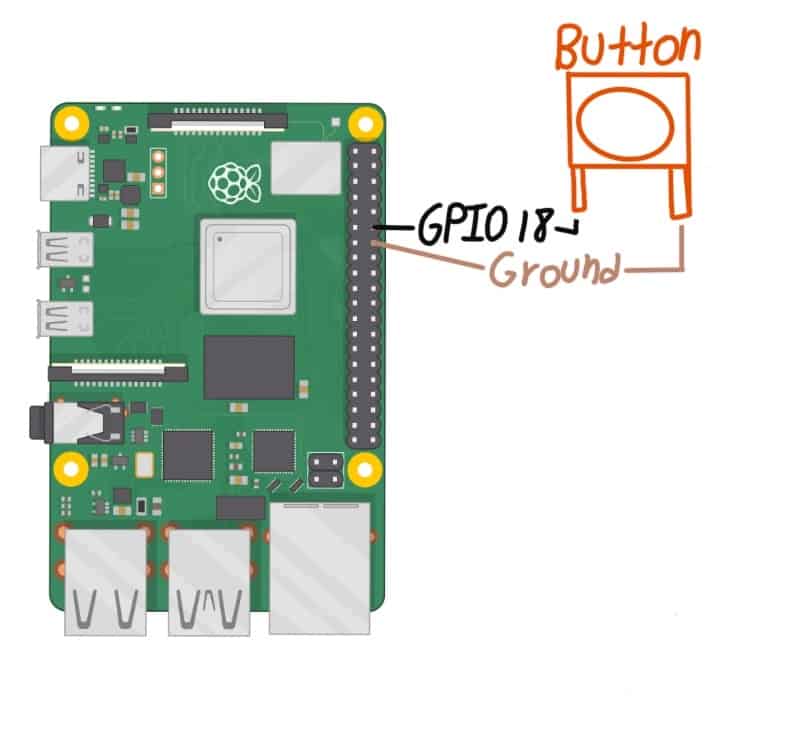
You can find GPIO 18 here- GPIO 18 (PCM Clock) at Raspberry Pi GPIO Pinout
The ground pin connection can connect to any of these but I use the pin directly under 18 to make it easy-Ground at Raspberry Pi GPIO Pinout
Connect the other end of the wires to the button you are using.
It doesn’t matter which wire goes to which terminal for the button.
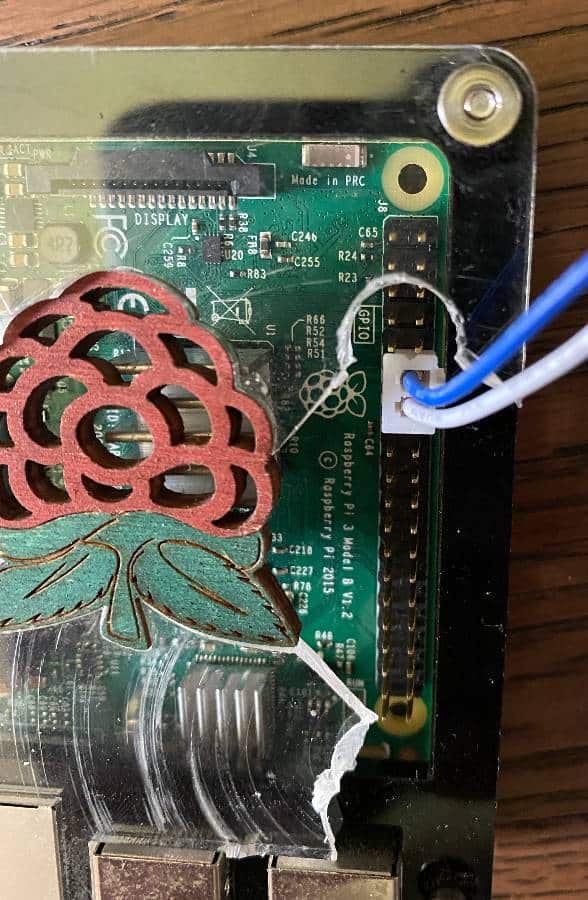
Here is a picture of an example of how mine looked the first time I wired it up;
Install Rust on Raspberry Pi
Installing rust on pretty much any device is very easy.
I recommend using the curl command provided here- Install Rust - Rust Programming Language
The command- curl —proto ‘=https’ —tlsv1.2 -sSf https://sh.rustup.rs | sh
Once you have installed rust on your machine make sure it works by running; rust —version
If you run into issues then you likely just need to configure the PATh environment variable which can be done very easily
add Rust to your PATH
- use nano to open your bash file
Sudo nano .bash_profile
- Add this line to the file;
export PATH=“/usr/local/mysql/bin:$PATH”
- Save the file and exit
- Control + O then Control + X
Get free Twilio account to send texts;
Create a free Twilio account and capture the account SID, AuthToken and phone number.
The Twilio website is here- Twilio - Communication APIs for SMS, Voice, Video and Authentication
Once you create an account you will need to create a project and capture the Account SID and the Auth Token so that we can add it to our code later.
bonus- if you need a full account or full account features you can use the code TWILIOQUEST to get $50 in full account supported credit.
Gather our code
Build the text message sender
First let’s build out program that sends a text message.
Open your command line interface and make a folder that we will use to store our text message sending program.
Use git to get the code to your computer locally into a folder called “pushtotext”;
git clone https://github.com/zachforrest/Pushtotext.git pushtotext
Note- you can use a different folder name but will need to adjust the code to point to this folder in the future. If you leave it named “pushtotext” you won’t shouldn’t have to this change.
Now that we have the text message code on our machine we can customize it with our phone number and other info.
Open the main.rs file in the folder and update this section with your info;
    let to = "ENTER-TO-NUMBER-HERE";

    let from = "ENTER-FROM-NUMBER-FROM-TWILIO-HERE";

    let body = "ENTERT-TEXT-HERE";

    let app_id = "ENTER-APP-ID-HERE";

    let auth_token = "ENTER-AUTH-TOKEN-HERE";
Note- the appid and authtoken are both going to come from the Twilio section above.
Perfect!
Now that we have updated our code we can build it and run it using the following commands;
cargo build --release
cargo run
If it built and ran successfully you should receive the text message you coded.
Awesome!!
Time to connect this to our button with a separate program.
Build the button program
If you are in the pushtotext folder use the cd .. command to go to the parent folder so we can clone another git project.
Now lets clone the button code to a new folder we can call pushbutton
git clone https://github.com/zachforrest/gpiotacticalbutton.git pushbutton
Now lets change directories to that folder cd pushbutton
RUN THE CODE;
- From terminal run the following commands;
cargo build --release
cargo run 18
- We are running the project now with the argument 18 being used to specify which pin the button is wired to.
What you should see now is the program runs and shows the button as either high or low and when the button is pressed it will call the other program to run and send the text message.
Get permission denied errors? If you did you may need to export your GPIO pin by running this command gpio export 18
To ensure you have exported GPIO 18 you can run this command to print a list of all GPIO pins which have been exported;
gpio exports
You should see GPIO 18 listed.
Woohoo! We just built it and ran it but what did we actually do?
Let’s look at the code!
First with this simple rust project there are two files we need to focus on;
cargo.toml - this file holds our dependancies and is written in a standard and easy to understand format.
main.rs - this is our main program file that contains all of our rust code.
For the pushbutton part under pushbutton folder
If we look at the main.rs file we will see the top part where we specify our dependancies for the program;
extern crate sysfs_gpio;


use std::env;

use sysfs_gpio::Pin;

use sysfs_gpio::Direction::High;

use std::time::Duration;

use std::thread::sleep;


use std::process::Command;
The next section contains our poll function.
Here you will see that the pin is polled and if it is pressed down it will call our other program.
You can see more details in the comments here - gpiotacticalbutton/main.rs at main · zachforrest/gpiotacticalbutton · GitHub
The last section we see is the main function section. This is the first code that is run in this application and as we see it takes in an argument (our button pin # ) and handles any errors before running our poll function in a loop. If the argument is not accepted when the program is run it spits out an error to let us know.
For the text message sending part under the pushtotext folder
You will also see a cargo.toml and main.rs file.
Opening main.rs you will see a similar layout as our last main.rs file with the dependancies being specified at the top and then the main rust logic following.
The main function is mostly variables with one command that sends the message client.send_message(msg).await;
Perfect now how do we run this code on startup so we can use our button program immediately.
Configure code to run at startup
We will want two things to happen on system boot;
- We want the GPIO pin 18 to export so that we can use it.
- We want our pushbutton program to start so it can listen for a button press.
You can do this a bunch of ways with a Raspberry pi. Here is an article that shows five; Five Ways to Run a Program On Your Raspberry Pi At Startup
We will be using method #4 from the above article using systemd files.
For the GPIO export
We can make a simple shell script that exports our GPIO pin. Then we can make a service that executes the script on startup.
- Create a shell script using nano from command line
sudo nano /usr/bin/gpio_config.sh
Once nano opens use the below code;
#! /bin/bash

gpio export 21 out

exit
- Create a unit file using nano from command line
sudo nano /lib/systemd/system/gpioconfig.service
- Add the following text to our service;
 [Unit]
 Description=GPIO Config
 After=multi-user.target

 [Service]
 Type=idle
 ExecStart=/bin/bash /usr/bin/gpio_config.sh

 [Install]
 WantedBy=multi-user.target
- The permission on the unit file needs to be set to 644:
sudo chmod 644 /lib/systemd/system/gpioconfig.service
- Now start the file during boot by running these commands:
sudo systemctl daemon-reload
sudo systemctl enable gpioconfig.service
- Reboot your machine so that you can run the service
sudo reboot
For the pushbutton program to run at startup
Create a unit file using nano from command line
sudo nano /lib/systemd/system/pushbutton.service
- Add the following text to our service; make sure you update the
ExecStart=section with the correct file path and where you cloned your pushbutton code
 [Unit]
 Description=PushButton Service
 After=multi-user.target

 [Service]
 Type=idle
 ExecStart=/home/pi/pushbutton/target/release/pushbutton 18

 [Install]
 WantedBy=multi-user.target
- The permission on the unit file needs to be set to 644:
sudo chmod 644 /lib/systemd/system/pushbutton.service
- Now start the file during boot by running these commands:
sudo systemctl daemon-reload
sudo systemctl enable pushbutton.service
- Reboot your machine so that you can run the service
sudo reboot
It’s a good idea to run the gpio exports command to make sure GPIO 18 is exported on startup.
To check how a service is running the background you can run this command to see how it is doing:
sudo systemctl status myservice
The output from this command will let you know what you should change if you are experiencing challenges still.
If you made it this far then I encourage you to grab a raspberry pi and give this a try yourself. It’s a great first project with a raspberry pi and rust.
References and sources;
https://github.com/zachforrest/Pushtotext.git
https://github.com/zachforrest/gpiotacticalbutton.git
https://www.rust-lang.org/production/users
https://www.raspberrypi.org/software/operating-systems/
https://www.raspberrypi.org/software/
https://www.rust-lang.org/tools/install
https://projects.drogon.net/raspberry-pi/wiringpi/the-gpio-utility/
Five Ways to Run a Program On Your Raspberry Pi At Startup
Use systemd to Start a Linux Service at Boot | Linode